Categories
Industry 2: Professional Practice and Enterprise Level 5

Industry 2: Career Skills Group Project

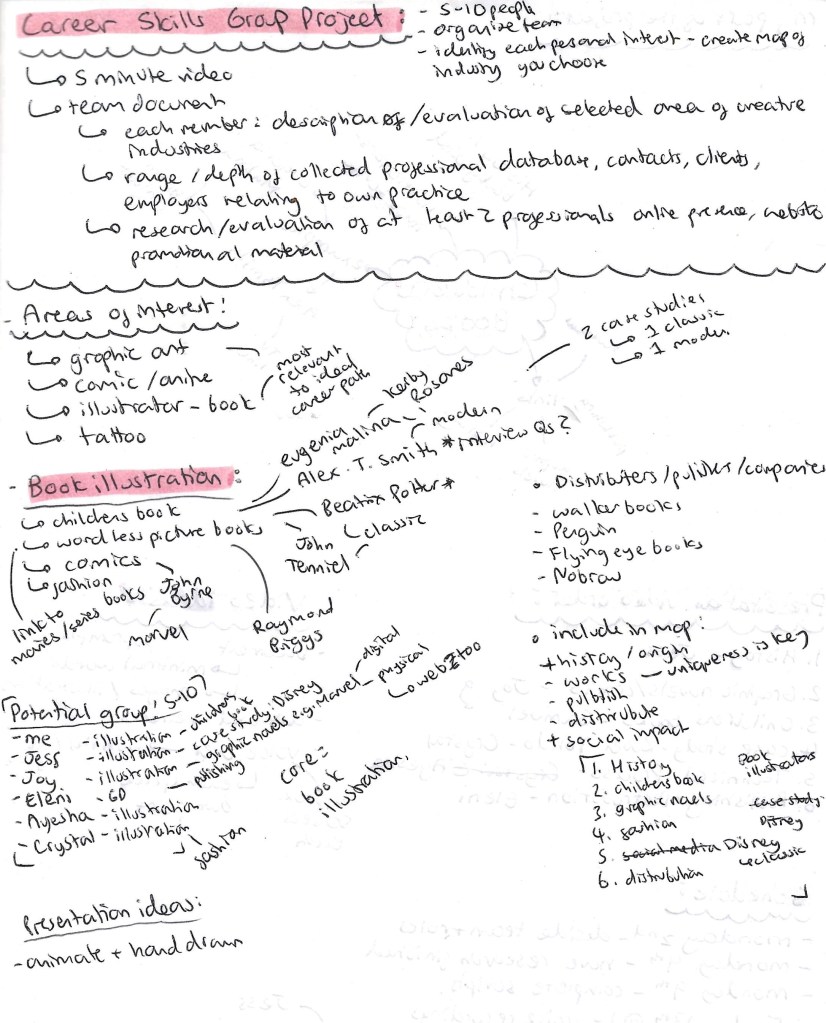
In this weeks session we began to work on our group project. The group project consists of 2 deliverables, a 5 minute video presentation and a team document. I came to the session with some notes and ideas about the topic I had in mind. I pitched my idea on blackboard and I got into a group with 5 other people, 4 from illustration and 1 from graphic design. We discussed the idea and came to the decision that the core theme of our presentation was gonna be book illustration.

Each of us is gonna take 1 subsection to research and take charge of. This is the mind map we made showing what we are each gonna do and how all 6 parts link in together to make a cohesive presentation.

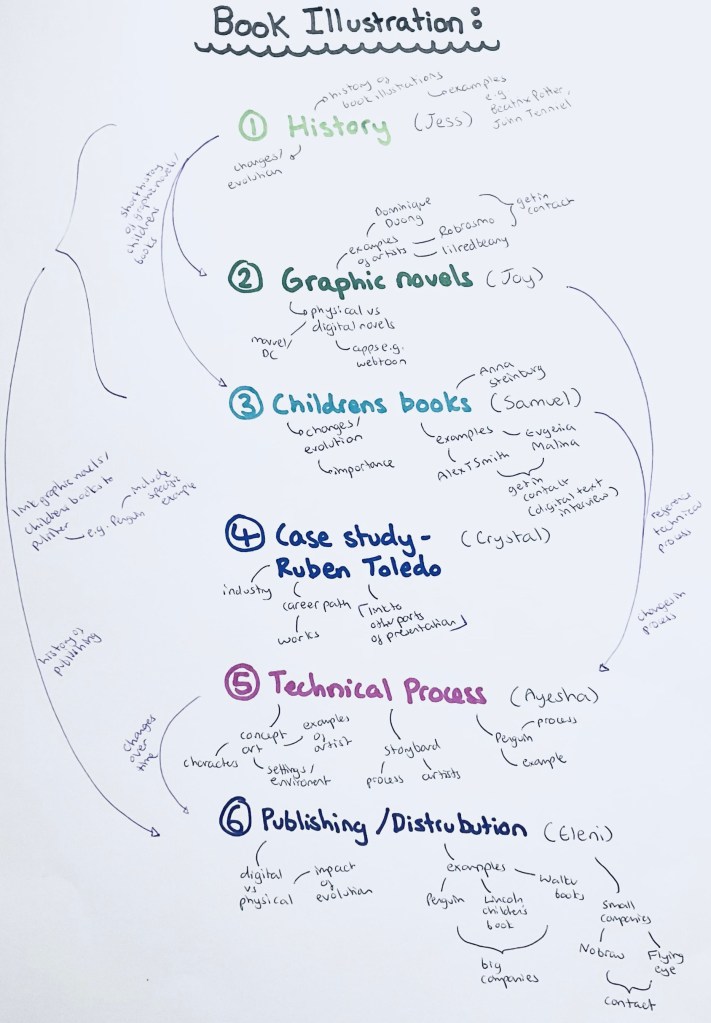
I will be focusing on children’s books. Throughout this week I will research each aspect on the mini mind map. The 2 illustrators that I’m gonna try get it contact with are Evgenia Malina and Alex T Smith.
We also discussed idea for how we want the video to be and created a schedule to help us meet the deadline.

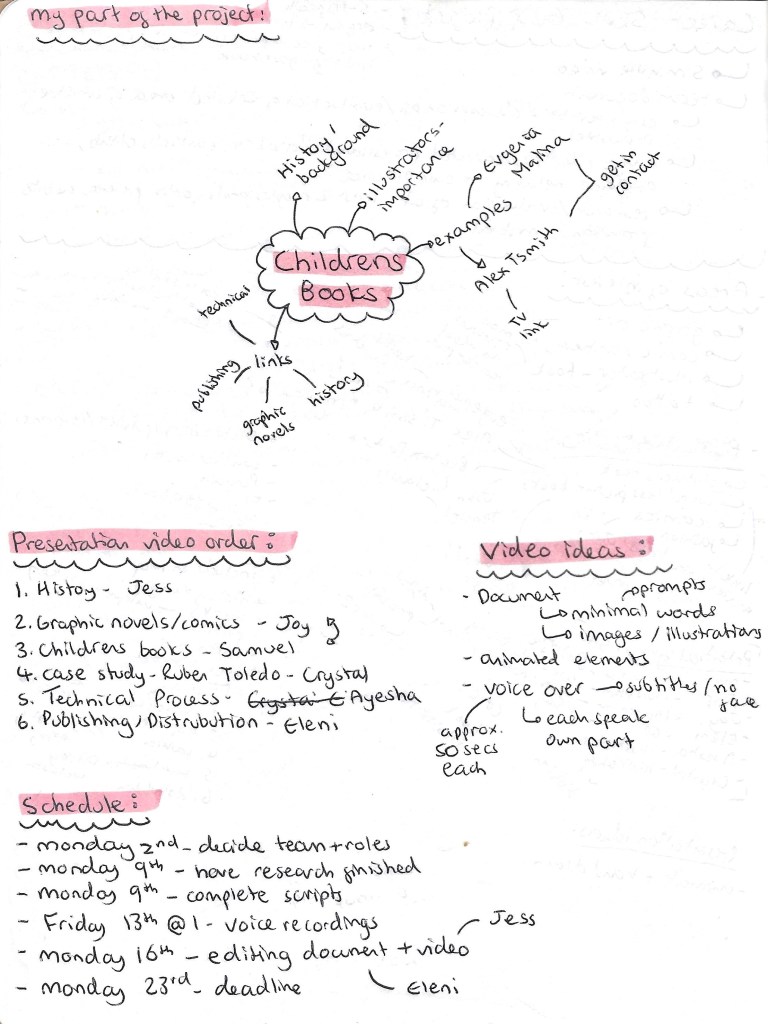
In accordance with our schedule I will complete my research into children’s books by Monday 9th so I can write the script in the Mondays session.

Categories
Industry 2: Professional Practice and Enterprise Level 5

Industry 2: Professional Practice and Enterprise introduction

In our first session we went though the Module handbook and I made notes about the deadlines, assessment criteria’s and assessment deliverables.

Categories
Level 5 Visual Storytelling

Visual Storytelling: Summer Brief

This task was given in preparation for the visual storytelling module. The task was to produce a wordless picture book for a famous story of our choosing. I wanted to work on a story that I’m passionate about so I chose my favourite book, Mrs Frisby and the Rats of Nimh by Robert C. Brien. Although I’ve read the book multiple times I needed a refresher of the story so I read through notes and summaries of the events. Then I was able to choose what I thought where the 6 key plot points that I could also create interesting and varied illustrations with. These are Timothy’s illness, Mrs Frisby getting advice from the Owl, Mrs Frisby going to meet the rats, the rats explaining their back story, Mrs Frisby escaping Mr. Fitzgerald’s cat and the mice’s freedom.

These are my initial thumbnail sketches for each of the 6 scenes. I gave the scenes each a 1 word title, sickness, advice, secrets, experiment, trapped and freedom. I varied each of the illustrations size and shape as well as compositional arrangement to keep them interesting. I look up any illustrations and visual media for the book that I could find to use as inspiration. The style I chose to go with was a black biro sketchy style. I really enjoy working with this medium and think it’s translates well to book illustrations.

Then I developed the initial sketches to include more detail and finalise the compositions.

These are the first 2 of the finalised images. I’m happy with my choice of style as I was able to get lots of texture and depth with the cross hatched shading. I also think this images represent Timothy’s sickness and Mrs Frisby getting advice from Mr Ages well.

Sickness:

Advice:

Categories
3D models summer work Level 5

Industry 1: Summer Project- Finished Models

Here are some pictures of the finished models. Overall I’m very happy with how they have turned out. I’m pleased with the colours and detail I was able to achieve. I learnt a lot from completing these. I stared the process completely new to all of it but I’ve learnt and became more confident with any skills. Such as 3d scanning, editing scans, 3d printing, and working on/painting 3d models. These are all skills I’d like to advance further. They did take longer than I originally thought they would to complete. At some points I did get a bit tired of it but in generally I enjoyed the process. I was given lots of creative freedom on this project and I liked that. I’m excited to see them displayed at the University in the model of the Great Hall.

These are some photos of the models in our exhibition at the Harrow campus. It was nice to see them on display and get some positive feedback about them. I’ll be continuing this project in the Industry 2 module so I look forward to that and the big exhibition at 309 Regents street.

I logged the hours I spent making these onto my DCDI work based learning form.

Categories
3D models summer work Level 5

Industry 1: Summer Project- Sealer

When all the painting was done and dry I finished them with a clear sealer. I lined them all up outside making sure to protect them if they fell. I sprayed them evenly all over from around 30cm away to help secure the paint and give them a matte finish. I sprayed them with 3 coats of sealer and left them to dry. Once this was all done I carefully packaged them up and sent them back to the university.

Categories
3D models summer work Level 5

Industry 1: Summer Project- Painting skin

Mixing and painting the skin tones was the most difficult part of the process. I tried to get the skin tones as accurate the the reference images as I could. I watched lots of videos to learn how to mix skin tones. I decided the most efficient way to do this would be to make a big mix of paint from equal parts red, yellow and blue then from that base created each models individual skin tone. I started with the darkest skin tone and worked to the lightest. This way I could work off the previous tone to create the next one. I did all the skin tones before I started any of the facial features. At this point it became very tricky to get into all the little areas without getting paint of the hair of clothes. Due to this progress became slower and the skin took me around 15 hours to complete.
Once all the skin was dry I started the facial features. I did research looking at marvel and other action figures to see how to do the facial features what what level of detail. I decided for each I’d do the lips, eyebrows and for the eyes, the white bit with a black pupil and line at the top for definition. I had to exclusively use the thinnest brush I have for these. I completed all of 1 feature before moving onto the next. I started with the lips, I used a more red version of their facial skin tones. This was the easiest feature to do. Then I did the eyebrows and used a variation of the hair colour. Finally, the eyes which where by far the hardest part as there was more detail and more room for error. I spent a while on each trying to get them symmetrical which was difficult with the texture of the models. I used black pen to get the pupil as it was too small to accurately use paint. These took me about 5 hours to finish.

Categories
3D models summer work Level 5

Industry 1: Summer Project- Painting outfits and hair

For painting the figures I began with the clothing. I had coloured reference photos for each of the figures. I took the ideas from the colours of the outfits but made lots changes as there where lots of dull greys and blacks. And these would have been boring to paint and less visually striking within the model of the Great Hall. I wanted to make sure they all stood out without making all the colours obnoxiously bright. Furthermore, the brief wanted modern day looking people so I tried capturing that with the colour choices.
I made sure to mix every colour myself and not use any paint straight from the tube. This make for more realistic and cohesive colour palettes. A tip that I was given was to desaturate the colours using grey to make the models appear larger. I made sure when making each colour to create an excess and not wash out the palettes. This way I would have spare to paint over any mistakes or bits I missed without spending the time mixing the exact colour again. This really helped save time especially as I got the the smaller details.
I used different thicknesses of brushes to cover all the clothes. I painted 1 models outfits fully then moved onto the next. This is the work flow I chose and after finishing it I feel like it was a good decision. The paint dried faster than I thought it would which was very helpful for speeding up the painting process. Completing all the outfits took around 25 hours in total

After the outfits I did the hair and accessories like caps and phones. There wasn’t a huge variety of hair colours, mostly shades of brown so I altered some but not drastically. I started with the darkest hair and moved to the lightest. I did each hair with slight colour variations. Giving it a bit more of a realistic look with some lighter and darker bits. With some of the longer hair I accidentally painted over bits of the clothing so it became very helpful that I had been saving the paint from the clothes. For the hair I mostly used thin brushes as there was lots of small gaps that were hard to fill. The hair took about 10 hair to do.

I’m very happy that the repairs I made with the modelling clay have held well and aren’t noticeable after I’ve painted them.

Categories
3D models summer work Level 5

Industry 1: Summer work- Paint testing

I spent about 2 hours practicing painting on the spare model. I tried out the different brushes and getting into the small gaps and little areas wasn’t a problem as I have some really fine brushes. The primer is effective as the paint seems to hold and cover the model well. Each part will need multiple layers to get the desired finish. Mixing colours for the clothes isn’t too difficult but skin tones are. I struggled with making skin tones but watched some videos on it and I now understand the theory of it. You start with black, white, red, yellow and blue. Then mix the 3 primary colours to create a base brown and build up on that by adding white, black or more of one of the primary colours. Continue to adjust the colour until you reach the right skin tone. For the painting style I’ll be taking inspiration from is the Marvel action figures that I have as they are around the same size and I’m gonna try capture the same amount of detail.

Categories
3D models summer work Level 5

Industry 1: Summer work- Primer

Spraying primer is an important step as it create a surface that the paint sticks to better. Before spraying the models I did some research about the best ways to apply the primer and tried using some of these techniques in my own work. I put on safety equipment such as a mask, glasses and a glove for the hand I moved the models with. I sprayed them outside and also let them air dry outside. I found different items around my house such as coasters and metal jar lids to stick the models feet to so I could move them without messing with the primer.

I had to shake the can for 2 minutes then spray from around 20cm away from the model, this helps to create a more even coverage. I did a combination of turning the model around, moving around the model and changing the height the model was at to try to cover every part.

As I worked through the models I became more confident in the best technique to cover them thoroughly and evenly. I waited around an hour after spraying them and looked to see which ones needed more. In total this process took around 3 hours. It was slow to begin with as I was figuring about the best way to spray them. They’re not all perfectly sprayed as I couldn’t get the primer into certain bits such as the folds of some of the clothing but I think they’re covered well enough for painting. The primer is grey which helped as it was obvious which bits had been sprayed.

The primer takes 24 hours to dry and hardened so after this I can begin painting them.

Categories
3D models summer work Level 5

Industry 1: Summer work- Sanding down

I used 3 different levels of sand paper and tweezers to sand down the models. I would begin by picking off any big bits then use the roughest sand paper to break down the worst areas. Then I’d use the other sand papers to smooth down the areas and then use a damp cloth to wipe off the filings. This was a slow process and took about 3 hours to do all of them. I’ve done the best I can at sanding them down but there was only so much I could do because of the texture created by the 3D printer.

I also made sure that all the models could stand. Some already could but other took more work. I either had to sand them down or add more miliput to create a flat base.

Now that they’re all repaired, sanded and able to stand I will spray them all with a primer to create a surface that’s better for the paint to stick to.